

Building Your First Technology Database from Scratch in CAMWorks
Learn how the Technology Database can help improve CAM programming productivity.
Introduction
If you’ve just installed CAMWorks and run Automatic Feature Recognition for the first time, you’ve probably noticed something: the toolpaths it generates are a reasonable starting point, but the feeds, speeds, and tooling don’t quite match what your shop actually runs. That gap — between what CAMWorks proposes and what your machines really do — is exactly what the Technology Database (TechDB) is designed to close.
Building a TechDB from scratch sounds intimidating. It sounds like a database administration project, not a machining project. In practice, it’s neither as complex nor as time-consuming as it seems, and the payoff — toolpaths that come out right on the first try, every time — is one of the most significant productivity gains CAMWorks has to offer.
This guide walks you through the entire process, from opening the TechDB editor for the first time to having a working database that reflects your shop’s real capabilities.
What the Technology Database Actually Is
Before touching any settings, it helps to understand what the TechDB is doing under the hood.
CAMWorks utilizes Knowledge-Based Machining (KBM). When the software recognizes a feature (such as a pocket, boss, hole, slot, or multi-surface) or when you define it manually, it does not just generate a generic toolpath — it consults the TechDB to determine how that feature should be machined. The database stores rules that link feature types to machining strategies, tooling selections, and cutting parameters.
Think of it as a digital twin of your most experienced programmer’s decision-making. When a senior machinist looks at a 20mm blind hole in 6061-T6 aluminum, they know exactly which drill to use, at what speed, with what peck increment, and whether to use a spot drill first. The TechDB is where you encode that “tribal knowledge” so it applies automatically to every programmer in your shop, on every single job.
The TechDB has four interconnected layers:
- Machines — your actual CNC machines. The CNC machines you have can be defined, with an option to define a virtual 3D machine for each.
- Tool Crib — your actual cutting tools: end mills, drills, taps, inserts, holders. What you have in stock, with real geometry.
- Operation Parameters — feeds, speeds, depths of cut, stepovers, and coolant configurations mapped to specific material and operation combinations.
- Machining Rules (Strategies) — the logic that dictates: “When you see this feature in this material, execute these operations in this exact order.” This is where CAMWorks’ automation truly lives.
You can build all four, or three, two, or just one and leave the rest as defaults. The most productivity can be accomplished by defining the latter three. Either approach is valid — start where the pain is greatest.
Step 1: Access the TechDB Editor
In CAMWorks, go to CAMWorks > Technology Database. This opens the standalone TechDB application — it runs separately from SolidWorks, so you can edit it while a part is open or independently.
The interface has a navigation pane on the left (navigating between machines, materials, features, and operations) and an editing panel on the right. Spend a few minutes clicking through it before making any changes. The structure makes more sense once you’ve seen where everything lives.
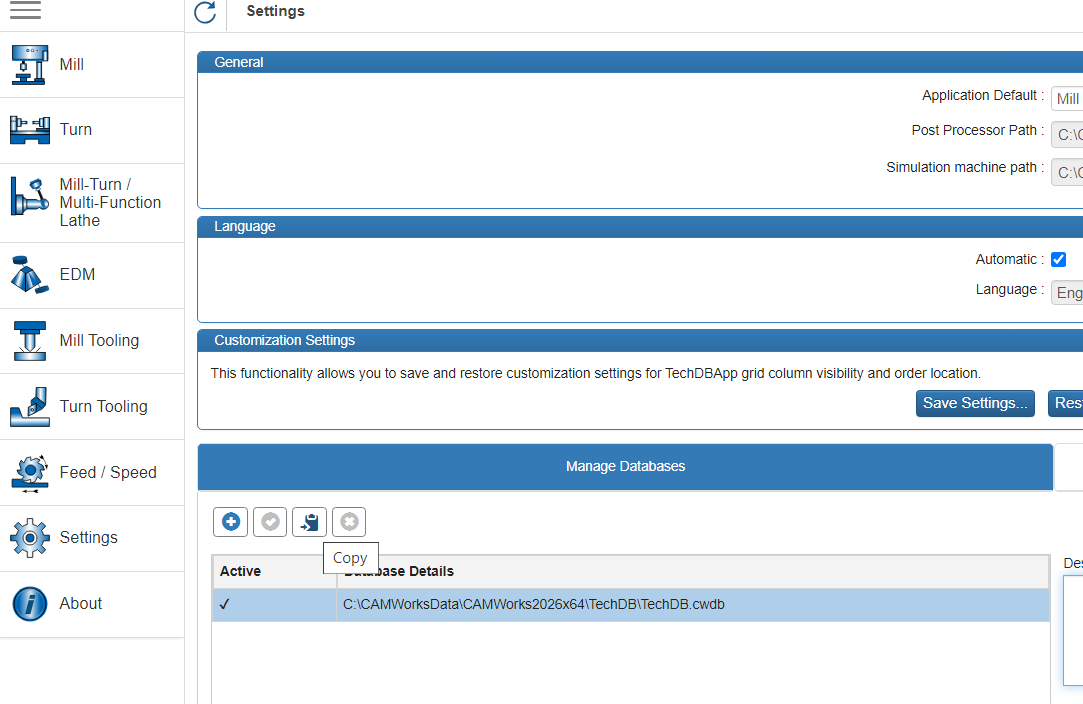
TechDB.cwdb). Before changing anything, make a backup copy of this file. Go to the “Settings” tab and at the bottom right you’ll see a command to make a copy of this file. TechDB can handle multiple databases, and any database can be made active.Step 2: Define Your Machine
Everything in the TechDB is scoped to a machine. Your rules for a 3-axis Haas VF-2 will differ from those for a 5-axis DMG Mori — different tool lengths, different spindle speeds, different capabilities.
In the TechDB tree, navigate to Machine and create a new entry (or edit the default “Mill” machine). Fill in:
- Machine name — use something descriptive: “Haas VF-2 40-Taper” rather than just “Mill”
- Number of axes — 3, 4, or 5
- Spindle speed range — your physical minimum and maximum RPM
- Maximum feed rate — the machine’s rapid and cutting feed limits
- Tool capacity — number of tool pockets in the ATC
If you run multiple machines, create a separate entry for each. CAMWorks lets you select which machine definition to use when you set up a job, and the TechDB rules can vary between them. You can set your most frequently used machine as the default.
Step 3: Build Your Tool Crib
This step has the highest upfront effort but yields the longest-lasting benefit. Every tool you enter here becomes available for automatic selection.
Navigate to Tool Crib in the TechDB. You’ll see a list of tools — probably populated with generic placeholders. Replace these with your actual inventory.
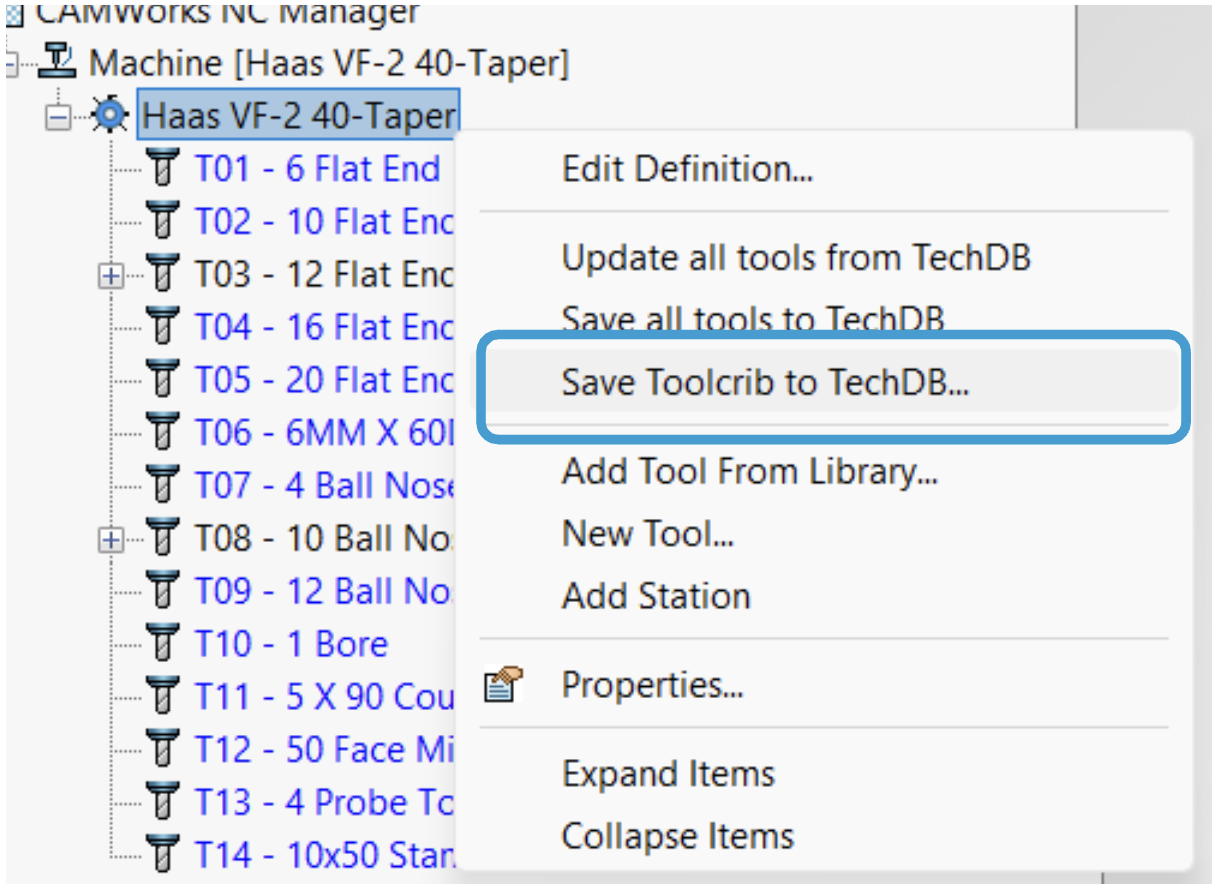
The easier approach is to assign an empty toolcrib to your machine and fill up the stations in CAMWorks. The toolcrib can be saved using the command “Save Toolcrib to TechDB.”
Many shops keep a spreadsheet of their tool inventory. If yours is well-maintained, you can work through it systematically — otherwise, walking the floor with a notepad for an afternoon is the fastest way to capture what’s actually in your cabinets.
Step 4: Configure Operation Parameters
This is where parameters that affect the toolpath, feeds, and speeds get connected to specific operation types. Navigate to Operations in the TechDB and you’ll see entries for: Rough Mill, Contour Mill, Face Mill, Drill, Tap, Bore, Ream, and others.
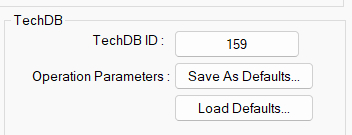
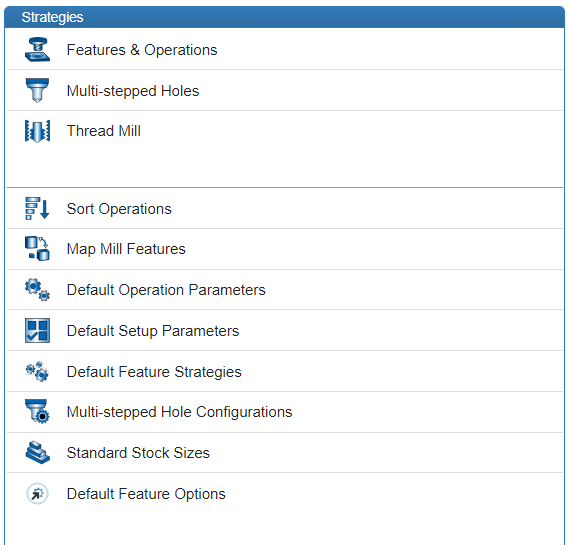
Operations are available in the Strategies and in the Default Operation Parameters.
To get familiar, start with the Default Operation Parameters. These defaults get used when you define operations one at a time in CAMWorks. If you are moving from any other CAM solution that was process-based, then Default Operation Parameters are like the “templates” used in some of those systems. You can create multiple default parameters, allowing flexibility to store machine-specific or material-specific defaults.
For each operation type, you can define parameters like:
- Spindle speed calculation method — from surface speed (preferred) or fixed RPM
- Feed rate calculation — from chip load (preferred) or fixed IPM
- Depth of cut — absolute value or as a ratio of tool diameter and flute length
- Stepover — for area operations, as a percentage of tool diameter
- Stock to leave — rough passes leave material; finish passes clean it up
- Passes — toolpath patterns to use, like pocket in/out or Volumill
- Leads and links — for entering and exiting material
- Coolant — flood, through-spindle, mist, or off
The most impactful parameters to get right first are:
- Depth of cut and stepover — these drive cycle time most directly
- Stock allowance — too much and finish passes cut heavy; too little and you can’t clean up
- Drill peck increment — this varies enormously by material and hole depth
Step 5: Write Machining Strategies (Rules)
This is the most powerful part of the TechDB. Strategies define the sequence of operations for a feature — not just how to cut, but what to do first, second, and third.
Navigate to Strategies to see rules organized by feature type:
- Hole features — spot drill → drill → tap (for threaded holes), or spot → drill → ream (for precision bores)
- Rectangular pockets — rough pocket → contour finish → floor finish
- Circular pockets — similar, with tool selection based on pocket diameter
- Bosses — rough → finish contour
For each feature type, you can specify:
- Which operations to apply and in what order
- Minimum/maximum feature dimensions that trigger the rule (e.g., use a different strategy for small holes vs. large holes)
- Material-specific overrides
Over time, your strategies will capture more and more of your tribal knowledge, and the amount of manual editing after feature recognition will shrink accordingly.
Step 6: Use and Test Against a Known Part
Before modifying the TechDB, use a part you’ve machined before — one where you know what the toolpaths should look like.
- Save tools and tool cribs — these tools will get loaded by default when you program your next part.
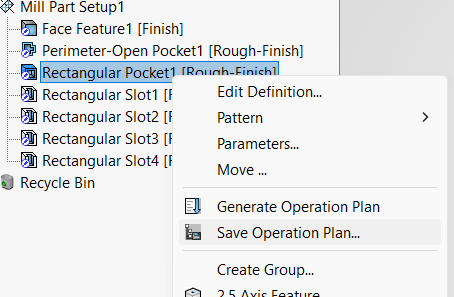
- Save Strategies (“Save Operation Plan”) for Feature Based Machining, or Save Default Operation Parameters (“Save as Defaults”) for process-based NC programming.
Make a new configuration in CAMWorks to start from scratch and test the TechDB against the same part. Take notes on every discrepancy. Each one points to a specific TechDB entry to adjust.
After a few iterations on the parts you program, your TechDB will be calibrated well enough for production use. You will notice a drastic reduction in the time needed to program your parts when a customized TechDB is used.
Common Mistakes to Avoid
- Starting too big. Trying to define every tool and every strategy on day one leads to confusion and a half-finished database that no one trusts. Start with the defaults provided and build it as you program your parts.
- Using theoretical speeds and feeds without validation. Cut data from a catalog is a starting point, not a final answer. Your shop and your machinists have knowledge about what works better for you — use that data.
- One set of data for all machines. If your 40-taper and 50-taper machines have different speed ranges and rigidity, they need separate entries. Mixing them produces compromised parameters for both.
- Not versioning the database. Use the Copy command available in TechDB to create backups. Date-stamp your
.cwdbbackups. When a change produces bad results, you want to be able to roll back.
How Long Does It Actually Take?
For a shop running a few materials with a stable tool inventory of 30–40 tools, a working first-version TechDB takes one experienced programmer about two to three days:
- Half a day to set up machines and enter tools
- One day to set operation defaults or strategies and test against real parts
- One day of iteration based on test results
It’s not an afternoon project, but it’s definitely not a month-long IT database management project either. And unlike most one-time setup tasks, this investment compounds — every job you program after that gets faster, and every new programmer you hire starts from a higher baseline.
The Bigger Picture
The TechDB is ultimately a knowledge management tool. Every time you tune a parameter or write a new strategy, you’re encoding experience that would otherwise live only in someone’s head — experience that walks out the door when that person does.
Shops that invest in their TechDB report 50–70% reductions in programming time for repeat part families, near-zero rework from incorrect feeds and speeds, and a much shorter ramp-up time for new programmers. Those aren’t marketing numbers — they’re the natural result of replacing manual lookups and individual judgment calls with consistent, tested, institutional knowledge.
Start small. Start accurate. Keep iterating. Six months from now, you won’t recognize how long programming used to take.
